salvadorsavas@salvadorsavas-systemproductname:~$ sudo lsblk
NAME MAJ:MIN RM SIZE RO TYPE MOUNTPOINT
sda 8:0 0 223,6G 0 disk
├─sda1 8:1 0 1G 0 part /boot
└─sda2 8:2 0 222,6G 0 part /
sdb 8:16 0 465,8G 0 disk
└─sdb1 8:17 0 465,8G 0 part
└─sas-saslv 253:0 0 1,2T 0 lvm
sdc 8:32 0 111,8G 0 disk
└─sdc1 8:33 0 111,8G 0 part [SWAP]
sdh 8:112 0 837,3G 0 disk
└─sdh1 8:113 0 837,3G 0 part
└─sas-saslv 253:0 0 1,2T 0 lvm
salvadorsavas@salvadorsavas-systemproductname:~$ history
1 sudo lsblk
2 sudo pvcreate /dev/sdb
3 sudo lsblk
4 sudo fdisk /dev/sdb
5 sudo lsblk
6 sudo fdisk /dev/sdh
7 sudo pvcreate /dev/sdb1
8 sudo apt-get install lvm2
9 sudo pvcreate /dev/sdb1
10 sudo pvcreate /dev/sdh1
11 pvs
12 sudo pvs
13 sudo vgcreate sas /dev/sdb1 /dev/sdh1
14 sudo vgs
15 sudo lvcreate -L 1200G -n saslv sasvg
16 sudo lvcreate -L 1200G -n saslv sas
17 sudo lvdisplay
18 sudo mkfs.ext4 /dev/sas/saslv
19 sudo mount /dev/sas/saslv /mnt/
20 df -h
21 history
sudo pvcreate /dev/sdb1
sudo pvcreate /dev/sdh1
sudo vgcreate sas /dev/sdb1 /dev/sdh1
sudo lvcreate -L 1200G -n saslv sas
sudo mkfs.ext4 /dev/sas/saslv
sudo mount /dev/sas/saslv /mnt/yedek
dmsetup ls | grep sdd
salvadorsavas@salvadorsavas-systemproductname:~$ sudo dmsetup ls
sas-saslv (253:0)
salvadorsavas@salvadorsavas-systemproductname:~$ sudo dmsetup remove sas-saslv
/dev/mapper/sas-saslv /mnt/yedek ext4 defaults 0 0
mount /dev/mapper/sas-saslv /mnt/yedek
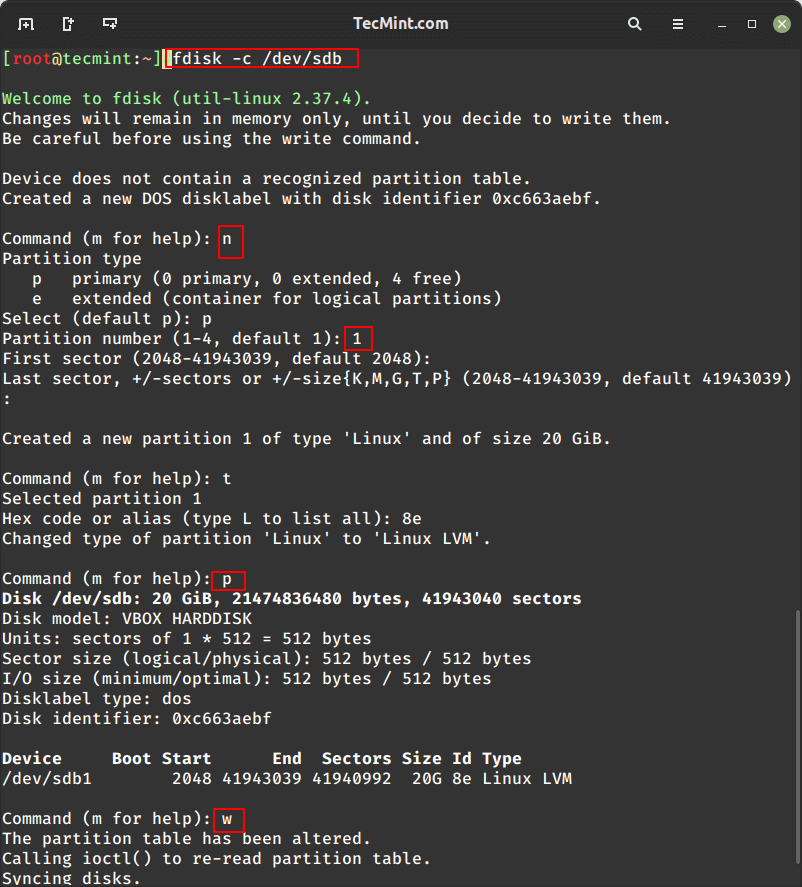
fdisk -c /dev/sdb
Daha sonra yeni bir bölüm oluşturmak için aşağıdaki adımları izleyin.Yeni oluşturmak için n'yi seçin.
Birincil bölüm oluşturmak için p'yi seçin.
Hangi sayıda bölüm oluşturmamız gerektiğini seçin.
Diskin tüm alanını kullanmak için iki kez enter tuşuna basın.
Yeni oluşturulan bölüm tipi t'yi değiştirmemiz gerekiyor.
Hangi bölümün değişmesi gerekiyor, oluşturduğumuz sayının 1'ini seçin.
Burada type'ı değiştirmemiz gerekiyor, LVM'yi oluşturmamız gerekiyor yani LVM'nin type kodunu 8e olarak kullanacağız,
eğer type kodunu bilmiyorsak
Tüm kod türlerini listelemek için L tuşuna basın.
Onaylamak için oluşturduğumuz bölümü yazdırın.
Burada ID'yi 8e LINUX LVM olarak görebiliriz.
Değişiklikleri yazın ve fdisk'ten çıkın.
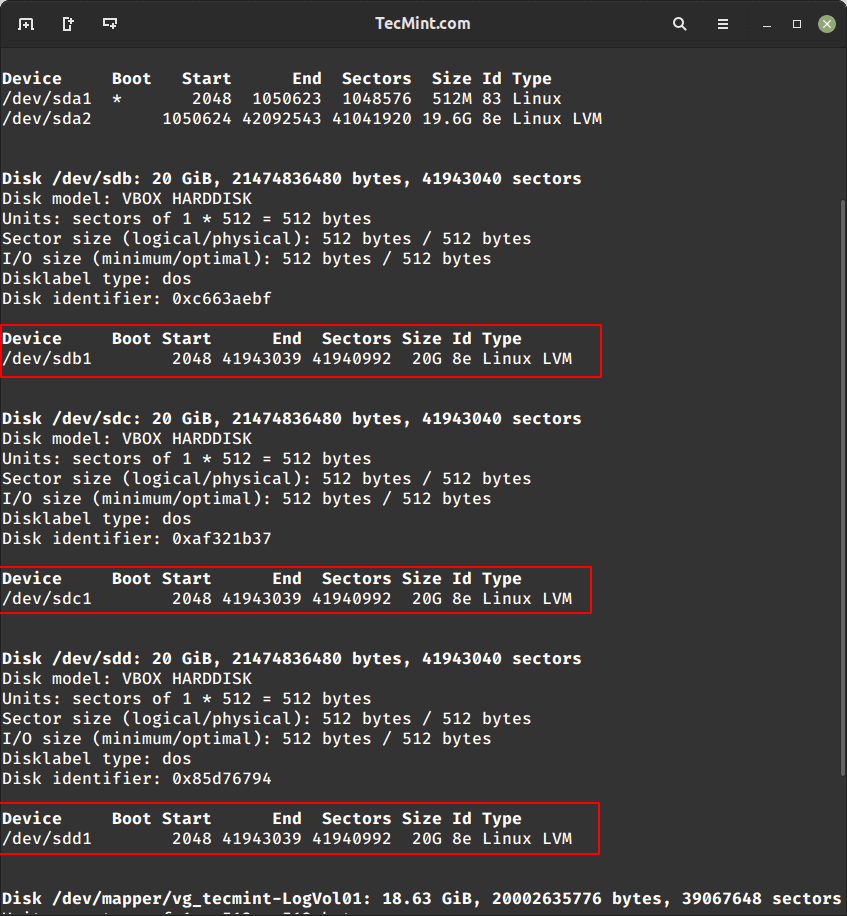
Diğer 2 disk olan sdc ve sdd için de yukarıdaki adımları uygulayarak yeni bölümler oluşturun.Daha sonra fdisk komutunu kullanarak bölüm tablosunu doğrulamak için makineyi yeniden başlatın.
fdisk -l
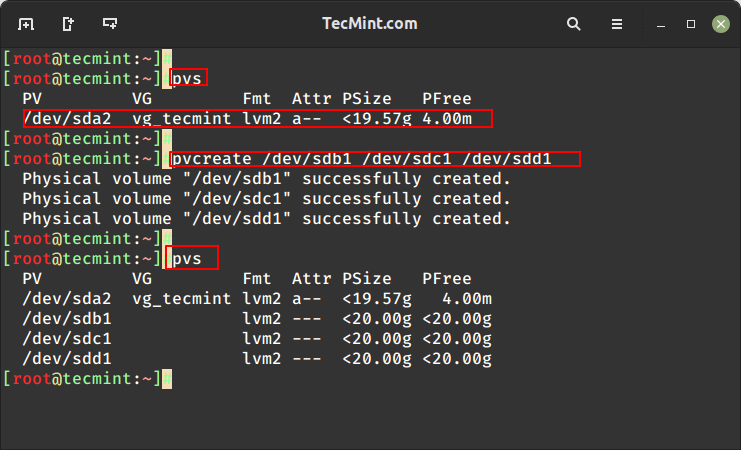
Create LVM Physical Volume
8. Now, it’s time to create Physical Volumes using all 3 disks. Here, I have listed the physical disks using the ‘pvs‘ command, and now only one default PV is listed.
# pvs
9. Then create the new physical disks and confirm the newly created physical disks.
# pvcreate /dev/sdb1 /dev/sdc1 /dev/sdd1
# pvs
Creating LVM Volume Groups
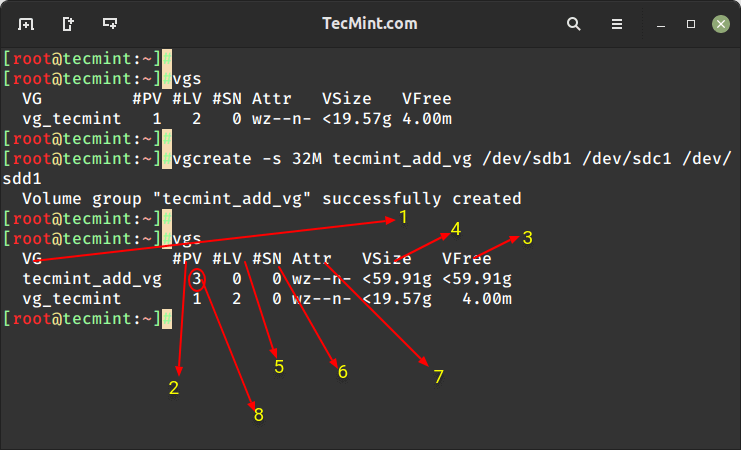
10. Create a Volume Group named tecmint_add_vg using the available free PV and a PE size of 32. To display the current volume groups, we can see that there is one volume group with 1 PV in use.
# vgs
11. This will create the volume group named tecmint_add_vg using a 32MB PE size and the 3 physical volumes we created in the last steps.
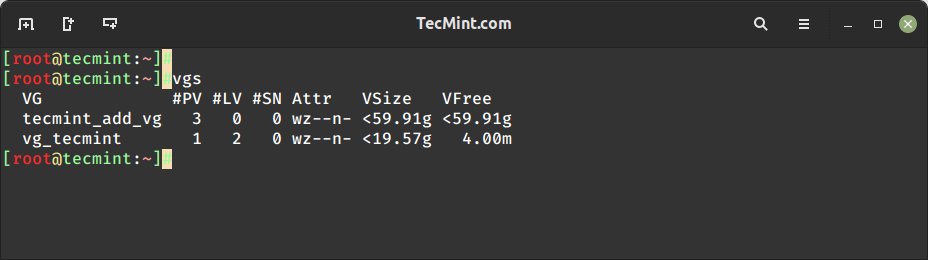
12. Next, verify the volume group by running the vgs command again.
# vgs
Confirm LVM Volume Groups
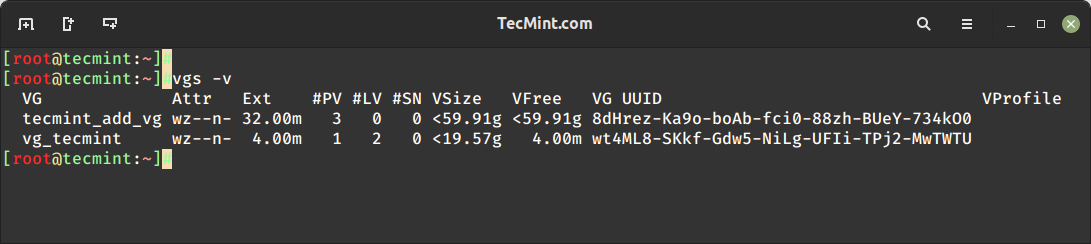
Understanding vgs command output:
Volume Group name.
Physical Volumes used in this Volume Group.
Shows free space available in this volume group.
Total Size of the Volume Group.
Logical Volumes inside this volume group, Here we have not yet created so there is 0.
SN = Number of Snapshots the volume group contains. (Later we can create a snapshot).
Status of the Volume group as Writeable, readable, resizeable, exported, partial, and clustered, Here it is wz–n- that means w = Writable, z = resizeable.
Number of Physical Volume (PV) used in this Volume Group.
13. To display more information about the volume group use the command.
# vgs -v
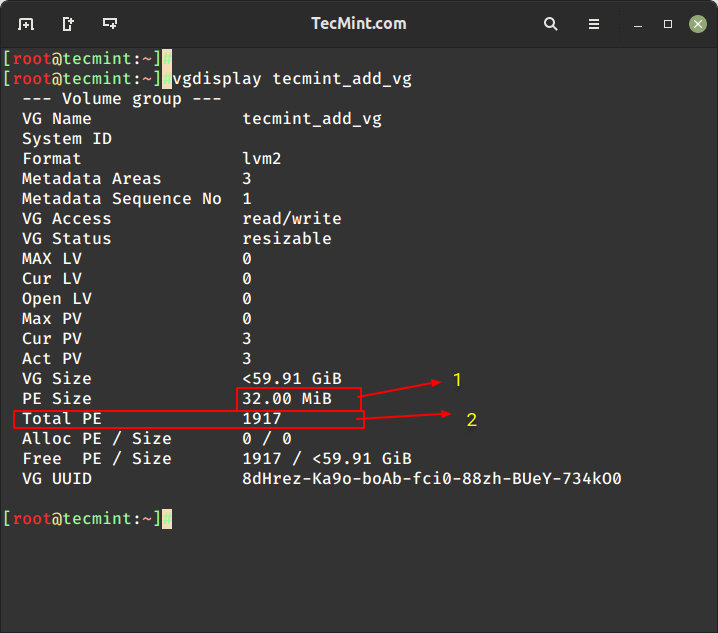
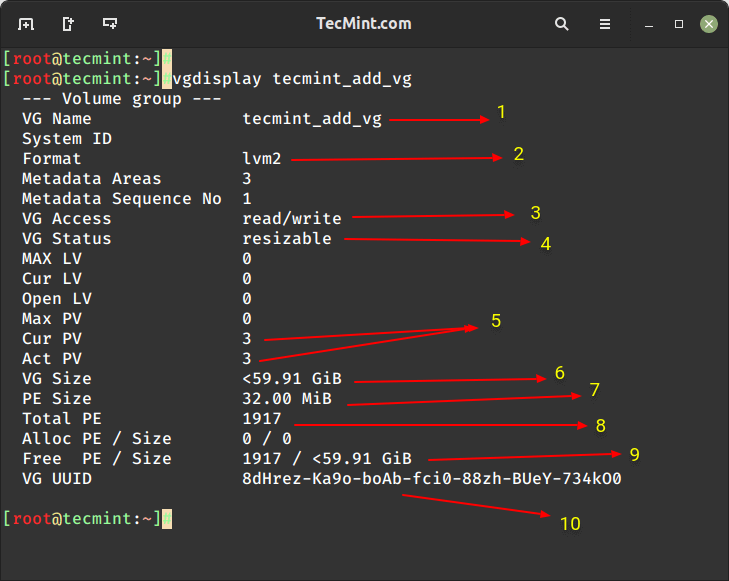
14. To get more information about newly created volume groups, run the following command.
# vgdisplay tecmint_add_vg
Here, is the description of each parameter shown in the above screenshot.
Volume group name
LVM Architecture used.
It can be read and write state, ready to use.
This volume group can be resizeable.
No Physical disk was used and they are active.
Volume Group total size.
A Single PE size was 32 here.
Total number of PE available in this volume group.
Currently, we have not created any LV inside this VG so it’s totally free.
UUID of this volume group.
Creating LVM Logical Volumes
15. Now, create 3 Logical Volumes named tecmint_documents, tecmint_manager, and tecmint_public. Here, we will demonstrate how to create Logical Volumes using both PE size and GB size.
First, list the current Logical Volumes using the following command..
# lvs
List LVM Logical Volumes16. These Logical Volumes are in the vg_tecmint Volume Group. To see how much free space is available to create logical volumes, list the Volume Group and available Physical Volumes using the ‘vgs‘ command.
# vgs
List Volume Groups
The volume group size is almost 60GB, and it is unused, so we can create LVs in it. Let us divide the volume group into equal sizes to create 3 Logical Volumes. That means 60GB/3 = 20GB. Each Logical Volume will be 20GB in size after creation.
Method 1: Creating Logical Volumes using PE Size
First, let us create Logical Volumes using the Physical Extent (PE) size. We need to know the default PE size assigned to this Volume Group and the total available PEs to create new Logical Volumes.
Run the following command to get this information.
# vgdisplay tecmint_add_vg
Create a New Logical Volume
The default PE Assigned for this VG is 32MB, Here Single PE size will be 32MB.
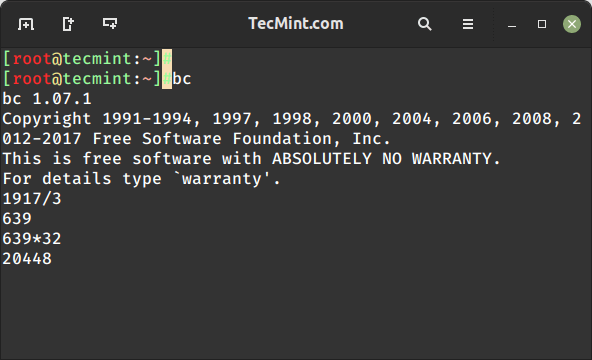
Total Available PE is 1917.
Just do and see a little Calculation using the bc command.
# bc
1917PE/3 = 639 PE.
639 PE x 32MB = 20448 --> 20GB
Calculate Disk Space
Press CRTL+D to exit from bc.
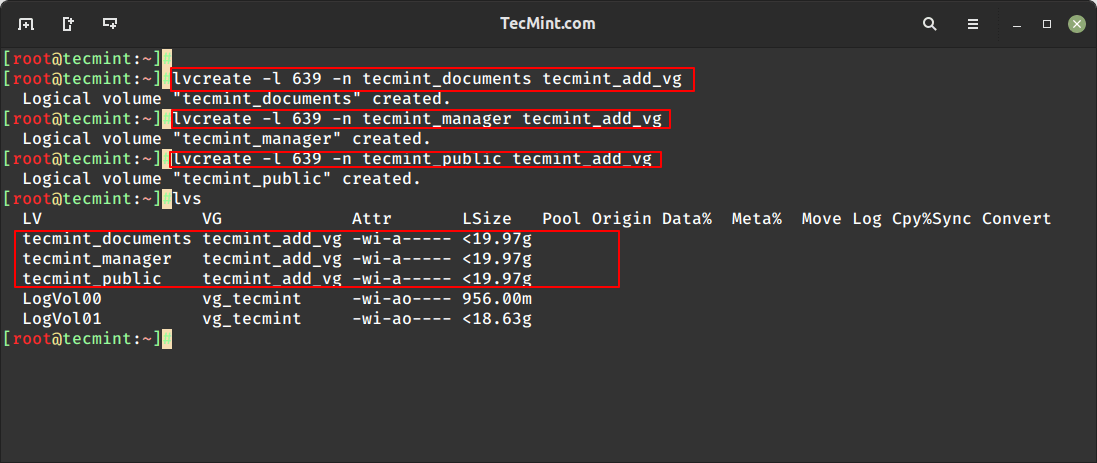
Let us now create 3 Logical Volumes using 639 PE’s. Here -l used to extend the size and -n to assign a logical volume name.
List the Created logical Volumes using lvs command.
# lvs
Here, we can see while creating the 3rd LV we can’t Round-up to 20GB, it is because of small changes in size, but this issue will be ignored while creating LV using Extend size.
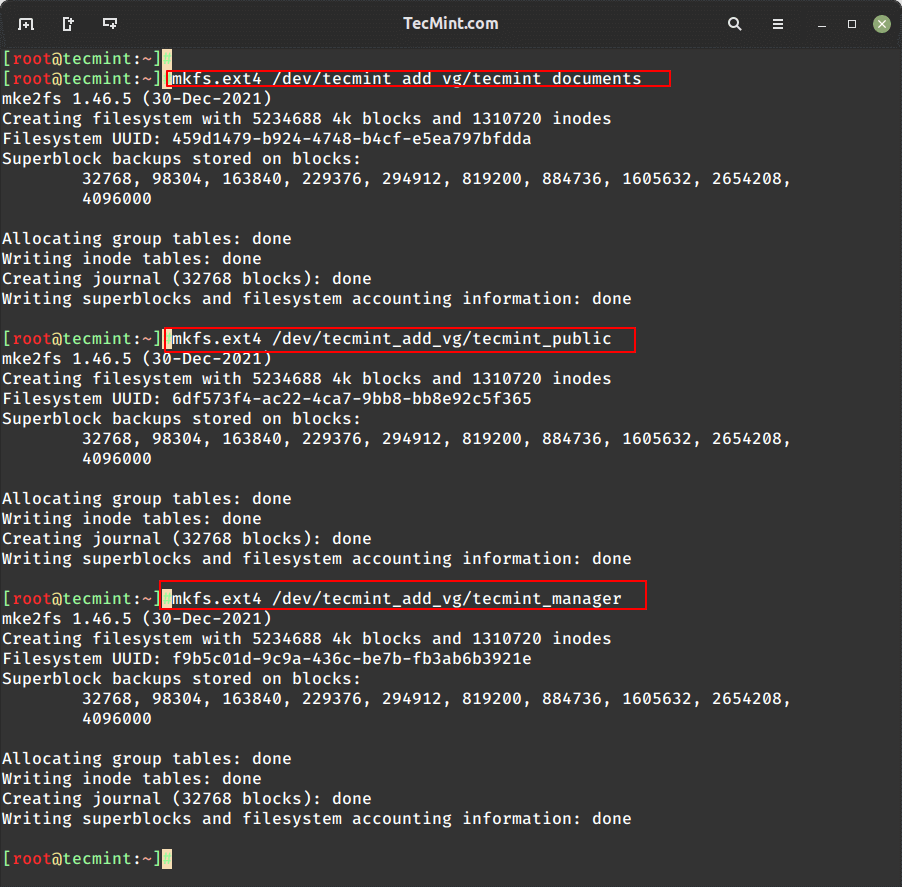
Creating File System
17. For using the logical volumes we need to format. Here I am using the ext4 file-system to create the volumes and going to mount them under /mnt/.
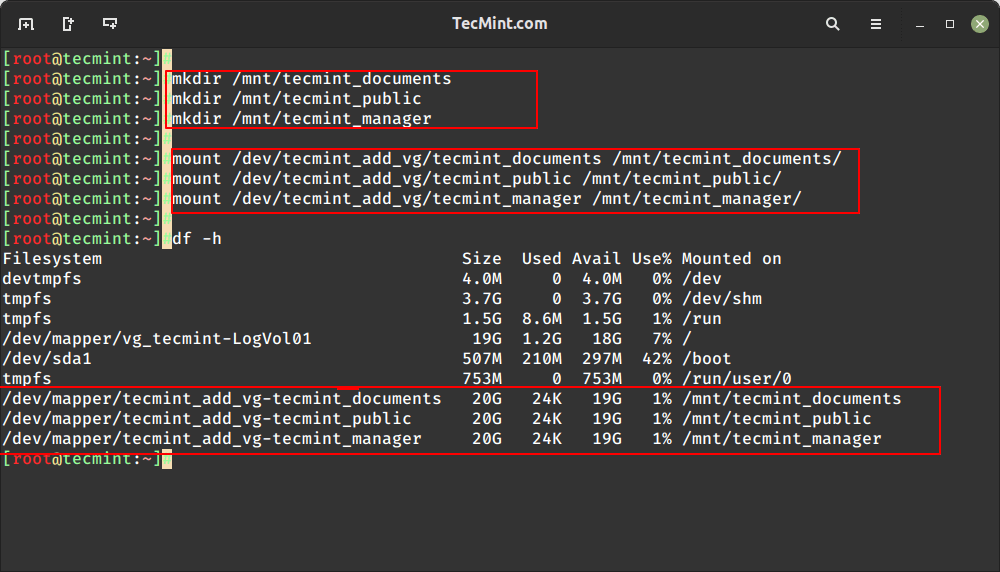
Create Ext4 File System18. Let us create directories in /mnt and mount the Logical volumes that we have created file-system.
# mount /dev/tecmint_add_vg/tecmint_documents /mnt/tecmint_documents/
# mount /dev/tecmint_add_vg/tecmint_public /mnt/tecmint_public/
# mount /dev/tecmint_add_vg/tecmint_manager /mnt/tecmint_manager/
19. List and confirm the Mount point using.
# df -h
Mount Logical Volumes
Permanent Mounting of Logical Volumes
20. It’s now temporarily mounted, for permanent mount, we need to add the entry in fstab, for that let us get the mount entry from mtab using
# cat /etc/mtab
21. We need to make slight changes in the fstab entry while entering the mount entry contents copies from mtab, we need to change the rw to defaults
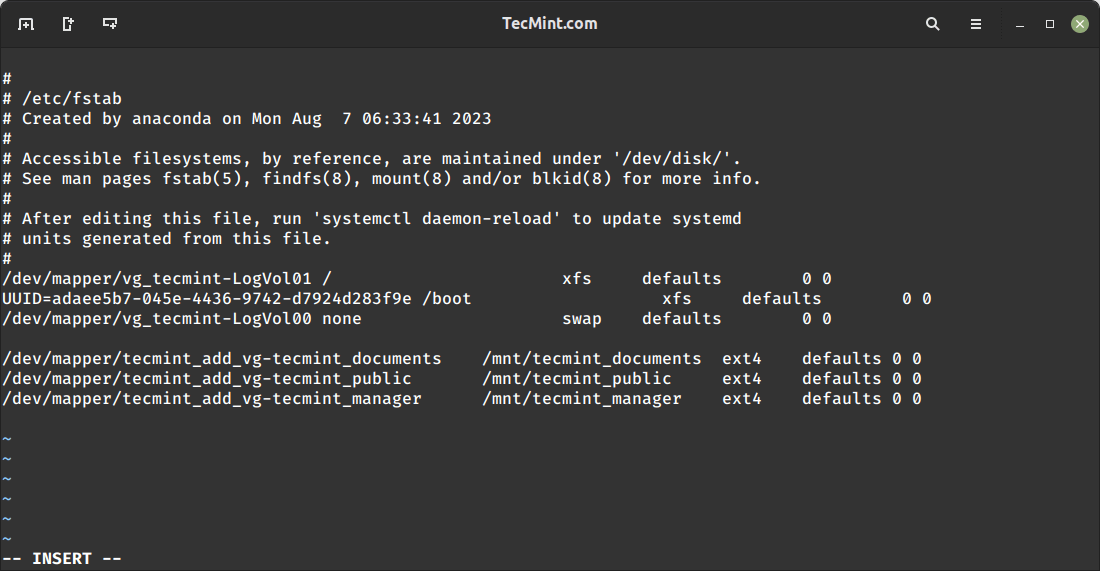
# vi /etc/fstab
Our fstab entries should look similar to the below sample.
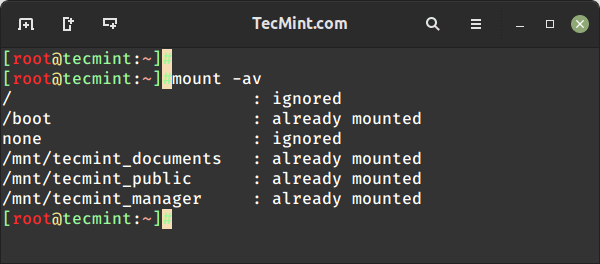
Permanent Mount Logical Volumes22. Finally, run the command mount -a to check for the fstab entry before restarting.
# mount -av
Confirm Mount Points
Here we have seen how to set up flexible storage with logical volumes by using physical disk to physical volume, physical volume to the volume group, and volume group to logical volumes.
In my upcoming future articles, I will see how to extend the volume group, and logical volumes, reduce logical volume, take snapshots, and restore from snapshots. Till then stay updated to TecMint for more such awesome articles.